
Concrete Walkway Installation: A Homeowner's Guide

You're probably looking at a front walk that has started to settle, crack, or hold water by the step, and you want to replace it once, not revisit it after a couple of winters. That's the right way to think about concrete walkway installation in Ottawa Ontario.
A walkway here isn't just a neat strip of concrete between the driveway and the porch. It behaves more like a small pavement system that sits on frost exposed ground, sheds meltwater, and takes repeated freeze thaw stress. The visible finish matters, but the work that decides whether it lasts is underneath. The National Research Council notes that Canada has roughly 100,000 kilometres of sidewalks, with 15% to 20% already needing replacement at an estimated $1.5 billion to $2.4 billion, and reports an average service life of 20 to 40 years depending on climate, location, and construction quality (Canadian sidewalk benchmark and service life context).
That's why the right questions aren't just about colour or curve radius. They're about slope, base prep, jointing, drainage, and whether the pour timing makes sense for Barrhaven, Nepean, Kanata, Stittsville, Orleans, the Glebe, or Centretown.
Table of Contents
Planning the Walkway Layout and Route - Choose width by actual use - Plan slope before shape - Respect trees, utilities, and the street edge
Excavation and Base Preparation - Excavate for the slab and the working base - Start with clean subgrade - Place Granular A in compacted lifts
Forms, Mix, Pour, and Finish - Set forms to line and slope - Use a mix that suits exterior flatwork - Pour, screed, and finish in the right order
Joints, Curing, and Cold Weather Rules - Cut joints where the slab wants to move - Protect the cure - Ottawa cold weather rules are stricter than generic guides suggest
DIY Versus Hiring a Contractor - Where DIY is realistic - Where a contractor earns the cost - The local knowledge factor
Timeline, Checklist, and Questions for Your Contractor - A realistic project rhythm - Pre-pour checklist - Questions worth asking before you sign
Planning the Walkway Layout and Route
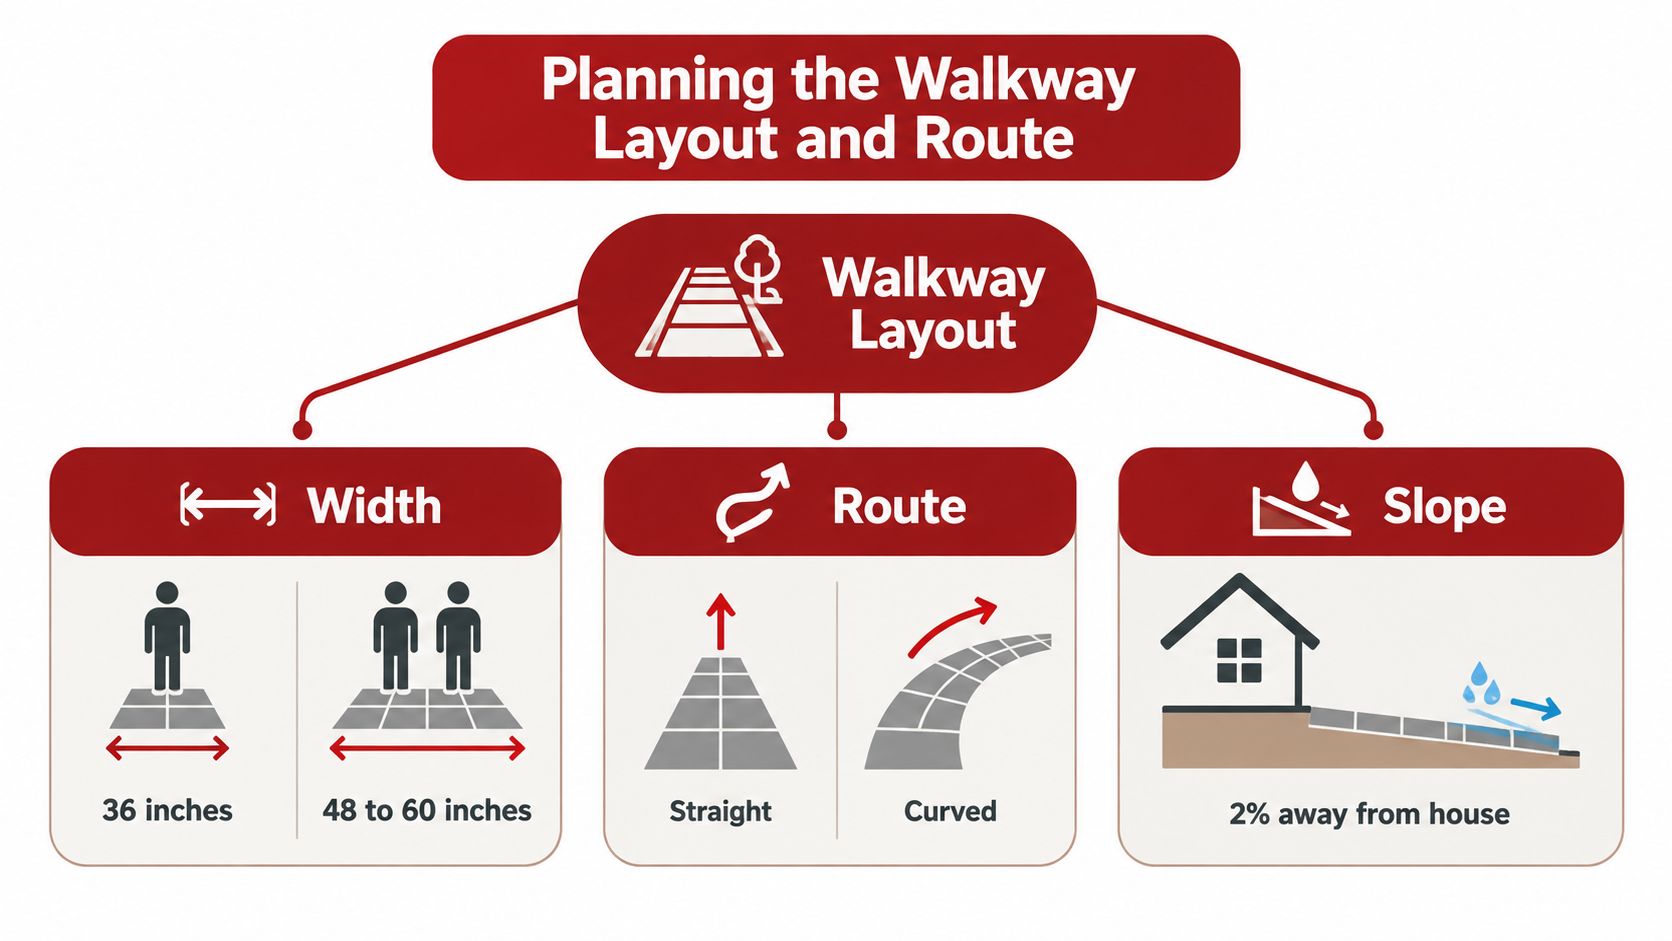
Before anyone digs, four decisions need to be settled. Route, width, slope, and transitions. If those aren't right on paper, the crew ends up forcing the base and forms to fit a bad plan.
Choose width by actual use
A lot of homeowners sketch a path that looks good from the street, then realise it feels tight once people use it. A narrow walk may work for single file foot traffic, but it becomes awkward at gates, porch landings, and anywhere you need to pass with a shovel, stroller, or wheelbarrow.
Use the width to match the job:
Single person access works at about 36 inches.
Side by side walking or wheelbarrow access usually feels better in the 48 to 60 inch range.
Transitions need attention at porch steps, fence gates, and driveway crossings so the width doesn't pinch at the exact spot where people turn.
Ontario code also matters here. The Ontario Building Code says exterior walks need an uninterrupted width of not less than 1,100 mm and a gradient not exceeding 1 in 20, with steeper walks treated as ramps (Ontario Building Code exterior walk requirements). If the walkway ties into a municipal sidewalk or a side entrance route, that minimum width becomes more than a comfort issue.
Plan slope before shape
Most walkway failures that homeowners call “concrete problems” start as drainage problems. The walk needs enough cross fall to move water away from the house, but not so much that it feels awkward underfoot.
Practical rule: A walkway that sits flat or pitches back toward the foundation will hold meltwater, feed ice, and exaggerate frost movement.
For exterior paths, Ontario accessibility rules set a maximum running slope of 1 to 20, and if the exterior path is a sidewalk it can only be steeper when it doesn't exceed the slope of the adjacent roadway (Ontario accessibility rules for exterior paths). In practical terms, homeowners should treat drainage and accessibility together, not as separate items.
If you want design ideas before fixing the geometry, browse a few concrete walkway design examples in Ottawa. It's easier to compare straight and curved routes once you understand how they have to drain.
Respect trees, utilities, and the street edge
Mature trees can make a front walk feel established, but roots will challenge any slab that's routed too close. If the path can shift slightly to protect a major root zone, do it now. Cutting roots for a cleaner line often leads to movement later, and future root growth doesn't care how straight the form boards were on pour day.
A few checks belong on every Ottawa planning list:
Confirm underground locates through Ontario One Call before marking the final route.
Check easements and property lines so the walk stays where it's allowed to be.
Look at the street connection carefully. If the walk meets a curb, apron, or boulevard edge, right of way work may trigger permit questions.
Match the finished grade at the public side so the edge doesn't end up proud and vulnerable to snowplows.
That last point gets missed in older neighbourhoods. In places like Orleans or Stittsville, a clean looking front walk can still fail early if the street side was set without thinking about plows, boulevard drainage, or winter salt exposure.
Excavation and Base Preparation
A walkway in Ottawa behaves like a small pavement system. The concrete on top matters, but the part that decides whether it heaves, settles, or stays flat is underneath it.
Homeowners often expect a shallow dig because the finished walk looks simple. In practice, the excavation has to account for the full assembly, the finished grade at the house and yard, and the fact that water under a slab becomes a winter problem fast. Ottawa freeze-thaw cycles punish any base that holds moisture or any subgrade that was left soft.
Excavate for the slab and the working base
A common sidewalk benchmark in Ontario is a 125 mm concrete slab over 100 mm of Granular A, with the support below compacted properly. That usually puts residential walkway excavation in the range of roughly 250 to 300 mm below finished grade once trimming, cleanup, and form control are included.
The exact depth can change. Clay lots, filled ground, and areas near downspouts often need more correction work than the drawing suggests. If the excavation exposes wet pockets or black organic soil, the answer is not to leave them and hope the stone bridges over them. Remove the weak material and rebuild that area on firm support.
Start with clean subgrade
Topsoil, sod, roots, mulch, and buried construction debris all have to come out. Organic material decomposes, shrinks, and leaves voids. That is one of the more common reasons a front walk settles in sections a year or two after it looked fine at handover.
A sound prep sequence is straightforward:
Mark the route clearly before digging so width, curves, and finished edges stay consistent.
Excavate to full depth and remove soft, pumped, or disturbed spots.
Keep frozen ground and slush out of the build because they create uneven support as they thaw.
Compact the exposed subgrade before any base stone goes in.
Keep site traffic under control so wheelbarrows and machines do not rework the soil you just tightened.
One field check matters here. Walk the excavation after rain or after a compactor pass. If an area deflects slightly underfoot, smears, or pumps moisture, it is still weak.
Place Granular A in compacted lifts
Granular A works only when it is installed in layers that can be compacted. Dumping the whole base in one thick lift and packing the surface leaves loose material below, and that hidden softness shows up later as settlement or rocking panels.
For a typical walkway, place the stone in lifts, compact each lift, then trim it to a consistent surface. The goal is boring but important. Uniform support under the whole slab. High spots force thin concrete. Low spots encourage the crew to fill with concrete during the pour, which changes slab thickness and makes finishing harder.
Drainage belongs in the base discussion too. Water trapped under the walk gives frost room to move the slab. On many Ottawa properties, especially older clay lots in established neighbourhoods, a dry base takes more effort than homeowners expect. Sometimes that means holding the excavation open for a short period to dry, sometimes replacing wet material, and sometimes adjusting adjacent grading so runoff does not feed the walkway base.
If you are comparing a poured walk with individual pavers or stepping stones, the base tolerance is different. A stepping stone path can suit lighter garden use, and these pro contractor stepping stone tips are useful for that type of project. A poured concrete walkway is less forgiving because the slab spans the full route. One weak spot underneath can turn into one cracked panel on top.
Good base prep is realistic DIY work on a short, simple path if you have the time, the compaction equipment, and a place to put the spoil. On longer runs, tight side yards, or lots with wet clay, excavation is often the part that pushes the job into contractor territory.
Forms, Mix, Pour, and Finish
A walkway pour can look fine at 3 p.m. and still fail early if the forms were loose, the mix carried too much water, or the finish sealed in bleed water. In Ottawa, that matters because this slab is exposed pavement. It takes snow, de-icing salts, meltwater, and repeated freeze-thaw cycles right at the surface.
Set forms to line and slope
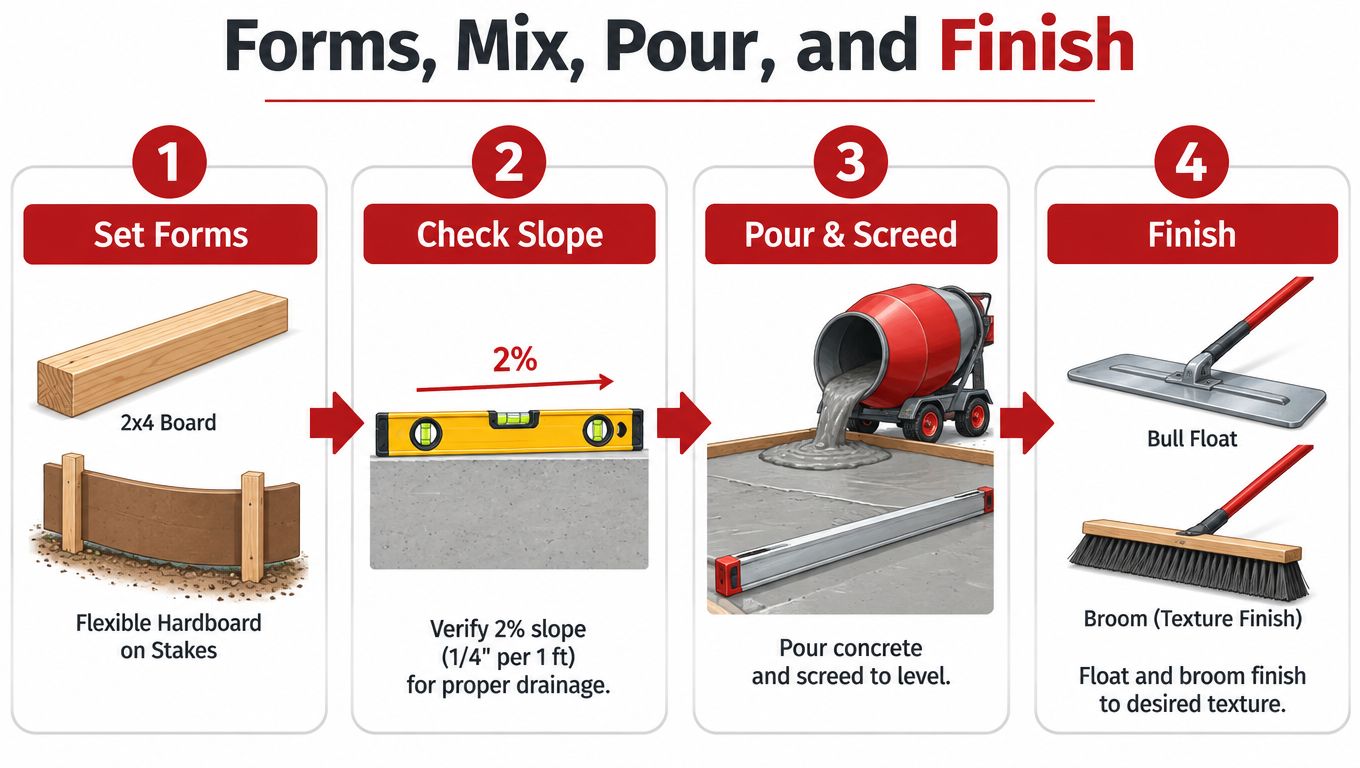
Forms do more than hold wet concrete. They establish the finished drainage and slab thickness, and both affect winter performance.
Straight runs usually get wood forms. Curves often need flexible form material. Either can work if the stakes are close enough and driven firmly enough that the form does not bow during placement. A wavy top edge in the forms becomes a wavy walking surface, and low spots tend to hold water and ice.
Before the truck shows up, check the string line, confirm the cross-slope and runoff direction, and measure depth in several spots. I also like to look at transitions closely, especially where the walk meets steps, a porch, or the driveway apron. Those connections are where homeowners notice trip edges first.
If part of the route crosses an area that may carry a vehicle, treat that section as a different slab. Pedestrian walkway rules do not automatically carry over to a driveway crossing. In practice, that usually means more thickness and a different discussion about reinforcement and joint layout.
Use a mix that suits exterior flatwork
For an Ottawa walkway, the mix needs air entrainment and controlled water. That is what helps the surface handle freeze-thaw cycling instead of scaling apart after a hard winter.
Ready-mix suppliers already have exterior flatwork mixes for this kind of use, so ask for one intended for sidewalks or exterior residential concrete. The mistake I see most often is adding water on site to make placement easier. It loosens the mix, but it also raises shrinkage, weakens the paste near the top, and leaves the surface more vulnerable to flaking once salt and freeze-thaw get at it.
Finish choices also need to respect the job the slab is doing. Decorative work can be added, but the slab still has to drain, cure properly, and keep traction in wet and icy conditions. If you are comparing plain broomed concrete with colour or pattern, these stamped and coloured concrete options show what can be added without changing the basic placement sequence.
Pour, screed, and finish in the right order
Once concrete starts going into the forms, the crew is working against the clock and the weather. Hot sun, wind, and low humidity can dry the surface too fast. Cool damp weather slows everything down. Good finishing is mostly timing and restraint.
The sequence stays simple:
Place the concrete close to final grade so it is not dragged around more than necessary.
Screed to the forms to establish the plane.
Bull float once to flatten ridges and embed aggregate just below the surface.
Let bleed water evaporate before further finishing.
Tool edges cleanly and keep the surface texture consistent.
Broom across the direction of travel for grip.
The step that gets rushed is waiting for bleed water to leave. Finishing over it traps excess moisture at the top and creates a weak skin. That weak skin is where scaling starts.
A smooth steel-trowel look does not belong on an exterior Ottawa walkway. A light broom finish is usually the right call because boots, rain, and thawed snow all demand traction. Clean work is the goal, not a glossy surface.
Joints, Curing, and Cold Weather Rules
A walkway in Ottawa lives through freeze, thaw, de-icing salts, shovels, and spring saturation. Treat it like exterior pavement, not a patio slab, and the decisions in this stage make more sense. Joints are there to control cracking. Curing is there to build surface strength. Cold-weather protection is there to keep the slab from losing that fight in its first few days.
Cut joints where the slab wants to move
Concrete shrinks as it cures. If there is no planned weak plane, it makes its own. On a walkway, that usually means a random crack right where you did not want one.
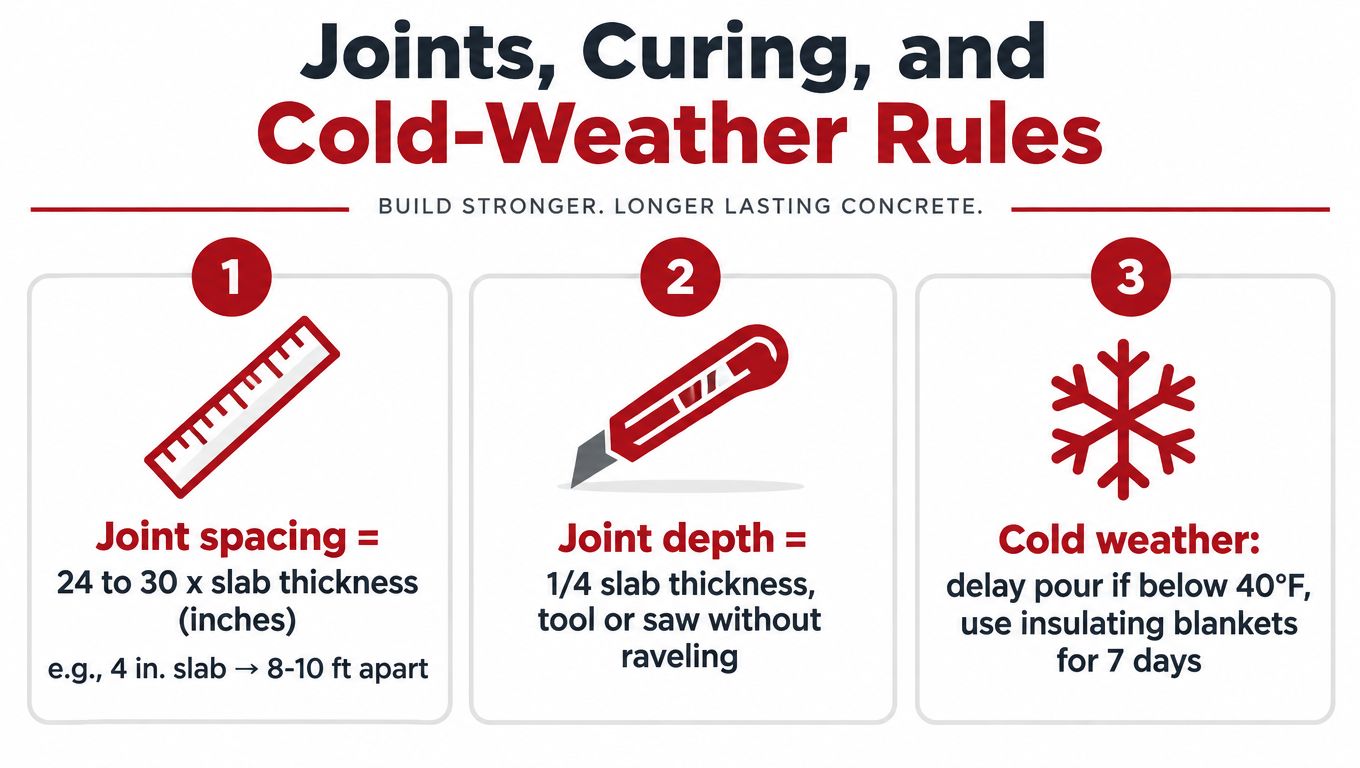
The practical rule is simple. Contraction joints need enough depth to work. On a typical 125 mm walkway, that means roughly 31 mm deep, or about one quarter of the slab thickness, as noted earlier. Shallower than that, the joint often reads as decoration instead of crack control.
Layout matters too. Good jointing starts before the truck shows up, not after the slab is down and everybody is rushing. Keep panels close to square, line joints up with changes in direction where possible, and avoid long narrow sections that crack across the short side.
A few jobsite rules hold up well:
Mark joint locations in advance so the spacing is intentional.
Cut or tool joints cleanly before the window closes.
Avoid odd panel shapes around steps, corners, and bends.
Use isolation material where the walk meets fixed concrete such as stoops or foundation walls.
That last point gets missed on small residential jobs. If the walkway is locked tight against a porch or set of stairs with no isolation joint, seasonal movement has nowhere to go.
Protect the cure
The first week decides a lot. Homeowners usually remember the pour day because it is visible. Contractors remember the curing period because that is when surface strength is won or lost.
Fresh concrete needs moisture retention, stable temperature, and protection from early traffic. Keep foot traffic off longer than feels convenient in cool weather, and do not pile soil, mulch, or sod against the edges right away. Edge damage starts early, especially on narrow walks.
New concrete usually fails early because it was opened, salted, or chilled before it had enough strength at the surface.
Residential walks do not come with a lab testing program, so the safe approach is patience. If nights are cool and days are damp, strength gain slows down. A walkway that looks hard can still be vulnerable to scuffing, edge chipping, and surface scaling.
Ottawa cold weather rules are stricter than generic guides suggest
Ottawa shoulder season pours get people into trouble because the daytime forecast looks fine and the overnight low gets ignored. Cold-weather concreting starts sooner than many homeowners expect, and the slab has to be protected after placement, not just during the pour.
Ottawa area utility specifications set clear limits. Concrete is not to be placed on surfaces below +4°C, and extra heat is required if temperatures are expected to drop sharply in the first 48 hours after placement (Ottawa area cold weather concrete requirements and frost movement note). That matches what crews see in the field. A walkway can finish nicely in the afternoon and still get damaged overnight if the subgrade, forms, or slab edge gets too cold.
Freeze-thaw exposure is the real issue. This is exterior pavement over soil that moves, sheds water, and refreezes. If the base is holding moisture and the young concrete goes through a bad temperature swing, you can end up with scaling, weak corners, or early cracking before the walkway has even seen its first full winter.
For a homeowner, the rule is straightforward. If the forecast is sliding toward cold nights, postpone the pour unless the contractor has a real protection plan with blankets, temperature control, and follow-up curing.
DIY Versus Hiring a Contractor
A homeowner can form and pour a small walkway. The hard part is building one that still drains, stays level, and comes through Ottawa winters without edge breakup, settlement, or random cracking.
Treat the job like exterior pavement over moving soil, not a backyard craft project. That changes the decision.
Where DIY is realistic
DIY makes sense on a short run with simple geometry and forgiving access. A side-yard path with one clear slope, no steps, no tight curves, and room to work is very different from a front walk tied into porch elevations, driveway grades, and shovel traffic all winter.
A homeowner has a fair shot when the project is:
Short and straight with simple formwork and no tricky transitions.
Small enough to place and finish without rushing once the truck arrives or the mixer is running.
Easy to access with tools and base material so compaction is practical, not improvised.
Scheduled in dependable warm weather with no need for cold-weather protection.
Within your actual skill set for forming, grading, joint layout, and finishing timing.
The usual failure point is not the pour itself. It is base prep, slope control, and timing the finish without adding water or overworking the surface.
Where a contractor earns the cost
Front entry walks, curved routes, narrow side yards, vehicle crossings, and tie-ins to existing concrete leave less room for error. So do projects where the finish grade has to meet stairs cleanly or direct meltwater away from the house in spring.
A good crew brings more than labour. They bring production pace, compaction equipment, layout judgement, and enough hands to place, screed, edge, joint, and finish before the slab gets away from them.
Factor | DIY | Hire a Contractor |
|---|---|---|
Layout control | Works on simple runs with obvious drainage | Better for compound slopes, curves, and clean tie-ins |
Base preparation | Depends on rented equipment and homeowner experience | Crew can excavate, place, and compact the base to a consistent standard |
Pour and finish window | Tight for one or two people | Easier to manage with a full crew and established sequence |
Correction of mistakes | Hard to fix once concrete is down | Better chance of catching grade or form issues before placement |
Ottawa winter durability | More vulnerable if base, joints, or curing are handled poorly | Better suited to frost-exposed walkway work |
If you are comparing prices, ask what is included. Some quotes cover excavation, granular base, disposal, forming, control joints, and cleanup. Others are closer to a placement-only number and leave the risky parts thin.
The local knowledge factor
Ottawa adds a layer many generic DIY guides skip. Frost depth, spring water, de-icing salts, and repeated freeze-thaw cycles punish weak base work fast. A walkway can look good on pour day and still fail early if the base is shallow, soft, or wet.
That is why contractor value often shows up a year later. The walk sheds water, the joints crack where planned, and the edges stay intact after the first winter.
Ontario cost data for interlocking concrete pavement gives a useful budgeting reference for homeowners looking at hardscape work more broadly, even though it is not the same as poured concrete. Installation costs in Ontario averaged $216 per square metre, about 9% below the overall respondent average of $237 per square metre, with replacement and base repair work in a range of $110 to $325 per square metre and a lifecycle expectation of roughly 20 to 30 years for comparable hardscape surfaces (Ontario hardscape lifecycle and cost benchmark).
The trade-off is straightforward. DIY can save money on a basic walkway with easy access and little consequence if the finish is not perfect. Once the route is frost-sensitive, drainage-sensitive, or tied into the front entry, paying for an experienced crew is often cheaper than tearing out a failed walk and doing the base properly the second time.
Timeline, Checklist, and Questions for Your Contractor
A walkway job often looks quiet for days, then suddenly a truck shows up, concrete is down by lunch, and everyone assumes the hard part was the pour. In Ottawa, the hard part is usually everything that happens before and after that day. A front walk has to ride out frost, meltwater, salt, and shoulder-season temperature swings. Treat it like a decorative slab and problems show up fast.
A realistic project rhythm
For a residential walkway, the calendar usually stretches longer than the hands-on work.
Planning the route, confirming grades, booking utility locates, lining up base material, and waiting for a usable weather window often take more time than excavation and placement. If access is tight, or if the walk ties into porch steps, a driveway, or a side gate, expect more coordination.
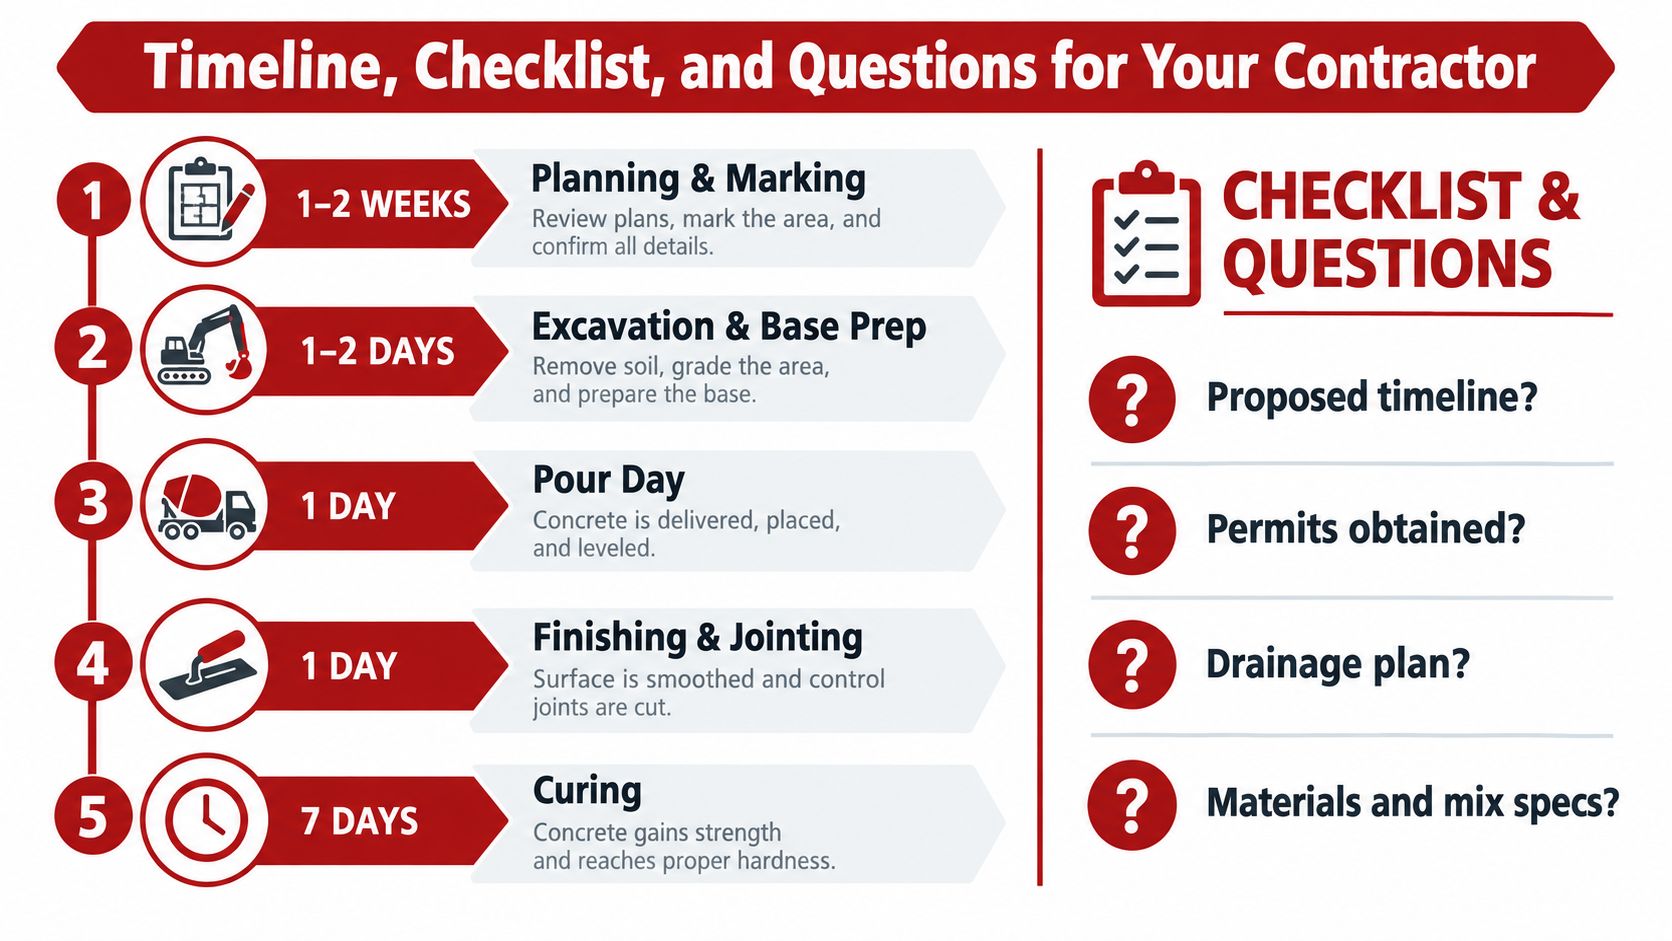
A workable timeline usually looks like this:
Planning, measurements, and utility locates over one to two weeks.
Excavation and granular base prep over one to two days.
Forming, pour, and finish in one day.
Saw cutting or tooled joint follow-up the same day or the next day, depending on the finish and site conditions.
Initial curing and protection for about a week before normal foot traffic.
Sealing, if you want it, later, after the concrete has had time to cure properly.
The sequence matters. Rushing the base or curing period to save a day usually costs more than it saves.
Pre-pour checklist
Before any truck is booked, confirm the parts that decide whether the walkway performs like pavement or starts moving after the first winter.
Route and width are confirmed at the porch, steps, gate, driveway edge, and street side.
Utility locates are complete and clearly marked on site.
Excavation depth matches the soil and exposure, not just the slab thickness.
Organic material, soft spots, and loose fill are removed before base stone goes in.
Granular base is placed and compacted in lifts so it stays stable through freeze-thaw cycles.
Forms are braced and checked for slope so water drains off the walk instead of sitting on it.
Mix and air entrainment are agreed in advance for Ottawa exterior conditions.
Joint layout is decided before placement around changes in direction, narrow sections, and tie-ins.
Curing materials and cold-weather protection are on site if the forecast is marginal.
Access for the crew, wheelbarrows, or buggy is planned so the prepared base does not get chewed up during placement.
Get the scope in writing. Homeowners and contractors usually run into trouble over excavation depth, spoil removal, curing protection, and cleanup, not over the color of the finish.
Questions worth asking before you sign
Good questions get past the square-foot price and into the parts that control service life.
How will you handle base depth if you hit soft or wet subgrade?
What granular base are you using, and how will it be compacted?
What concrete mix are you ordering for an exterior walkway in Ottawa?
How are joints laid out, and when will they be cut or tooled?
What slope are you building for drainage away from the house and off the walking surface?
What is your plan if temperatures drop or rain shows up around pour day?
How soon can the walkway be walked on, salted, or sealed?
What exactly is included in the price: excavation, disposal, stone base, forming, concrete, finishing, curing, and cleanup?
Straight answers matter here. If a contractor is vague about compaction, joint spacing, or cold-weather protection, that is usually the weak point in the job.
If you are comparing bids, review what a residential concrete contractor scope should cover and check each quote against that list.
Ottawa Stamped Concrete installs walkways, patios, driveways, porches, and pool decks across Ottawa Ontario, including Barrhaven, Nepean, Kanata, Stittsville, and Orleans, with attention to grading, base prep, pouring, and finishing that fits local freeze thaw conditions. If you want a walkway that's planned as a pavement system rather than treated like a thin decorative slab, visit Ottawa Stamped Concrete to review services and discuss your project.
Comments